Yoast WordPress SEO Plugin is one of the best plugin available in WordPress repository. This is a must have plugin to optimize your WordPress site with all aspects of SEO. It was developed by Joost de Valk provides features more than other premium SEO plugins. This WordPress SEO Plugin is very stable and proven so powerful that even SearchEngineLand and Mashable uses it.
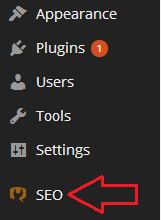
- First of all, after installing the plugin, Go to the settings of the plugin via left panel named SEO.
- Then you will be able to see the following options in WordPress SEO Dashboard :
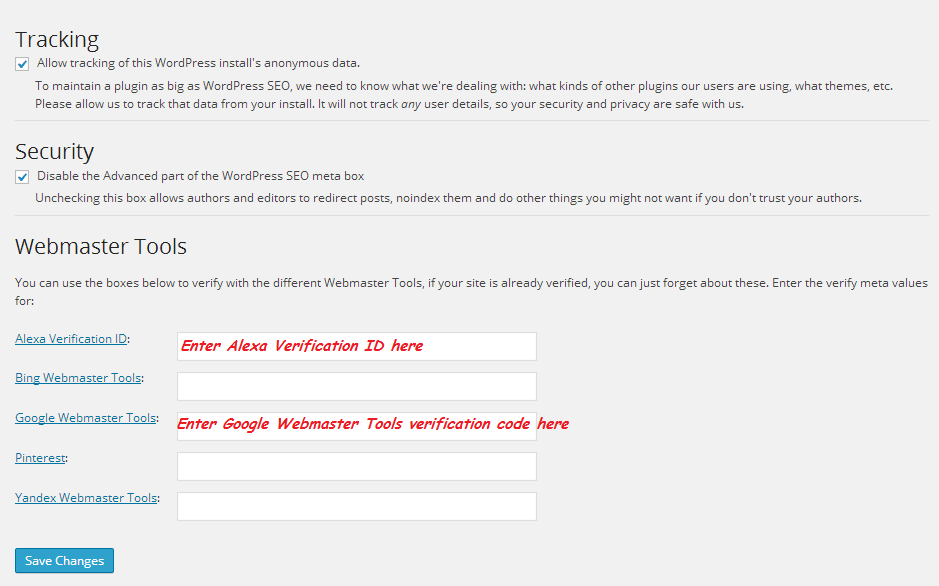 Tracking: Ticking this option will send anonymous data to the author of the plugin, Which will help him in tracking if any issue occurs in the future. Untick if you are more concerned regarding privacy of your blog.
Security : If your blog has guest blogging enabled then, you can tick this option to disallow them redirecting or no-indexing posts.
Webmaster Tools: This tool lets you verify ownership of your WordPress site quickly. You have just to insert values provided in meta tags by Google Webmaster Tools or Alexa.
These tools will help you in providing data like sites linked to your site, site links, crawl errors and other insights. After inserting everything, you can just click on save changes.
- Titles & Metas : Now here comes Titles & Metas, This tool helps in configuring the title of site, meta keywords and description. Also it has options to clean up the tag. It has several tabs in it, We will configure one by one.
General Tab : This tab includes options such as force rewrite titles, meta keywords tag and clean up the head tag.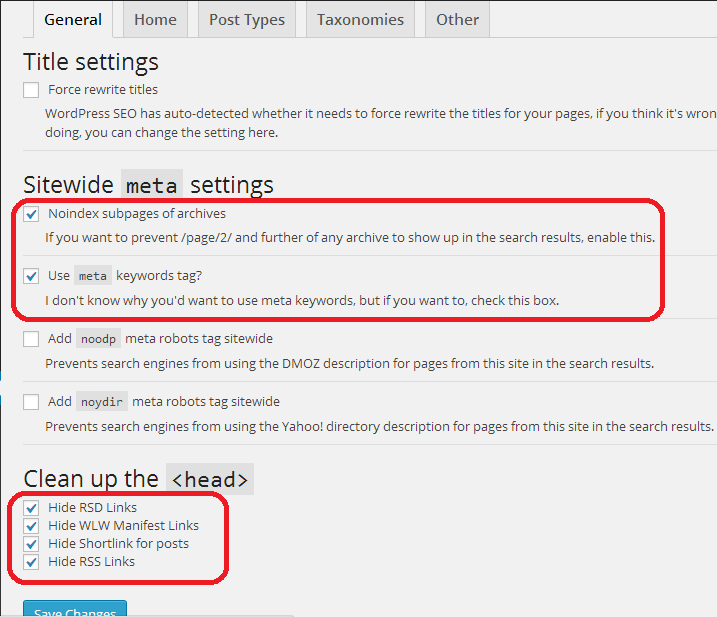
Force rewrite titles : You can leave this unticked as WordPress automatically detects whether titles need to be rewritten or not. titles need to be rewritten or not. - Noindex subpages of archives : You must tick this option to remove unnecessary subpages of your WordPress site from index.
Use meta keywords tag : Although Google don’t care about meta keywords of your site, but still you can tick it for the sake of other search engines like Bing.
Clean up the head: Tick all the options to clean the head by hiding RSD, WLW, RSS and Shortlink for posts. Save changes and proceed to next step “Home“. - Home Tab: This tab includes all the settings like title, meta description and meta keywords of the template.
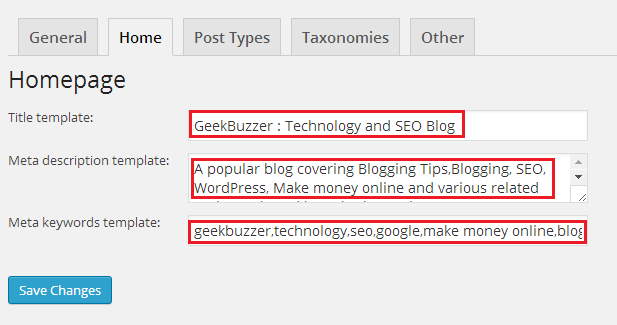
Title template: This will be the title of the homepage shown in Google, it should be of 5-9 words and maximum 70 characters.
Meta description template: This will be meta description of the home page, it should not be exceeding 156 characters. You can also use focus keyword here, but don’t spam it.
Meta keywords template: Here you can add keywords for homepage you are focusing on. Just add 4-5 keywords not more than that. Save changes and then proceed to next step “Post Types“. - Post Types Tab: This tool will allow you to set titles and metas for posts, pages and media.
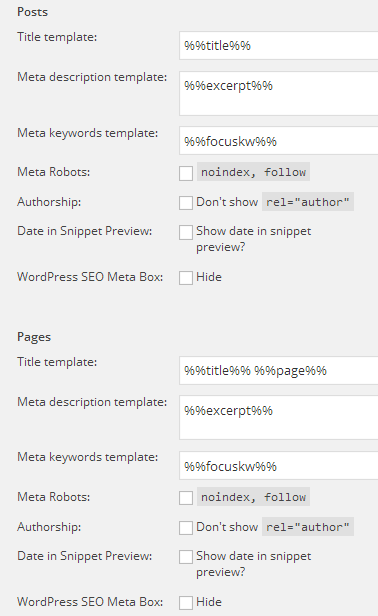
Title template: %%title%%
Meta description template: %%excerpt%%
Meta keywords template: %%focuskw%%
It’s already done so no need to change anything here except, one option.
Date in Snippet Preview: Tick Show date in snippet preview if your blog or site is about news, contests or coupons otherwise leave it unticked. - Taxonomies: This tool allows you to configure title & meta for categories and tags.
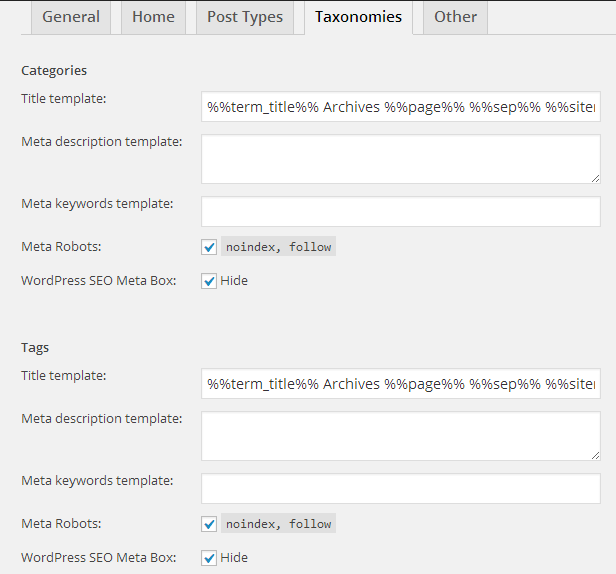
Since we have to noindex, but follow categories and tags, Do following settings:
Categories:
Meta Robots: Tick noindex, follow
WordPress SEO Meta Box: Tick Hide
Tags:
Meta Robots: Tick noindex, follow
WordPress SEO Meta Box: Tick Hide - Other : Using this tool, You can configure title & meta for Author and date archives, Also here you can configure the title for search and 404 pages.
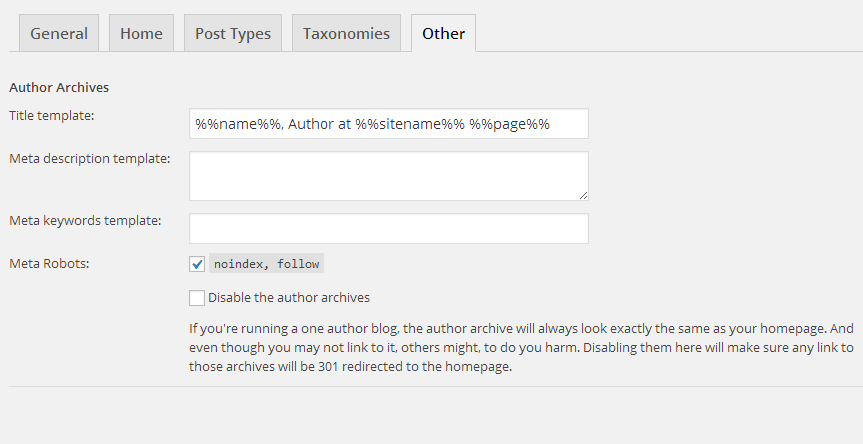
Just tick noindex, follow in Meta Robots for both Author and Date Archives. - Social: Here you can integrate your WordPress site with Facebook, Twitter and Google+. You can add Facebook open graph meta tags, Twitter card meta data and Google+ specific post meta data.
Facebook: Simply tick the option Add Open Graph meta data, then enter the link to any logo or image which will show up as a thumbnail whenever your website is shared or liked on Facebook and also if your post does not have any image in it, then Facebook will show up that thumbnail by default.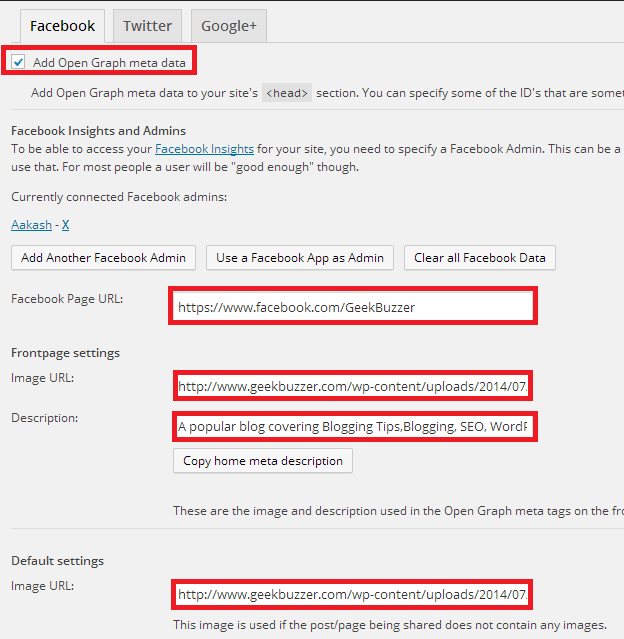 Add Open Graph meta data: Tick
Facebook Page URL: Enter URL of your wordpress site’s Facebook fanpage here.
Frontpage settings:
Image URL: Enter URL of the logo or image of your wWordPresssite, Which you want to be showed up every time your home page is liked or shared.
Description: You can simply click on copy home meta description.
Default settings:
Image URL: Enter URL of the logo or image of your wordpress site, Which you want to be showed up when posts which don’t have any images are liked or shared. You can validate your Facebook Open Graph meta tags after saving settings using Facebook Debugger. - Twitter : Similarly simply tick the option Add Twitter card meta data and, then enter the username of your wordpress site’s twitter account.
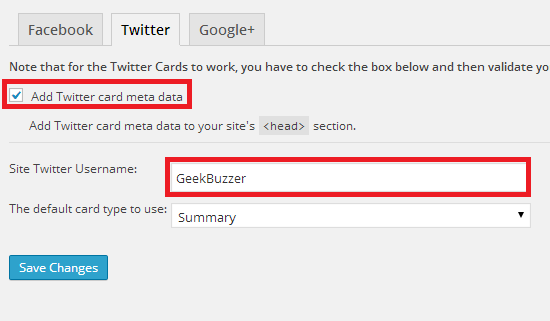
Add Twitter card meta data : Tick
Site Twitter Username : Enter username of your wordpress site’s twitter account here. Using Twitter card you can attach image or media to tweets that can drive traffic towards your wordpress site. You can validate your Twitter card meta tags after saving settings using Twitter Validation Tool. - Google+: similarly in Google +, simply tick the option Add Google+ specific post meta data and enter URL of your wordpress site’s google+ page.
Google Publisher Page: Enter URL of your wordpress site’s google plus page here. Now click on Save Changes. You can validate your Google+ specific post meta tags after saving settings using Google Structured Data Testing Tool.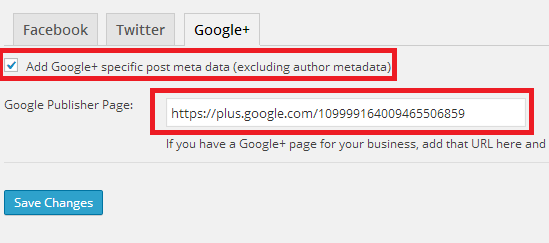
Add Google+ specific post meta data : Tick
- XML Sitemaps : XML sitemap helps search engines to understand your website better while crawling. It helps in faster indexing of your wordpress site. Yoast SEO plugin also include functionality to create a xml sitemap for which you have to use separate plugin earlier. You can simply enable XML sitemap menu from XML Sitemaps panel.
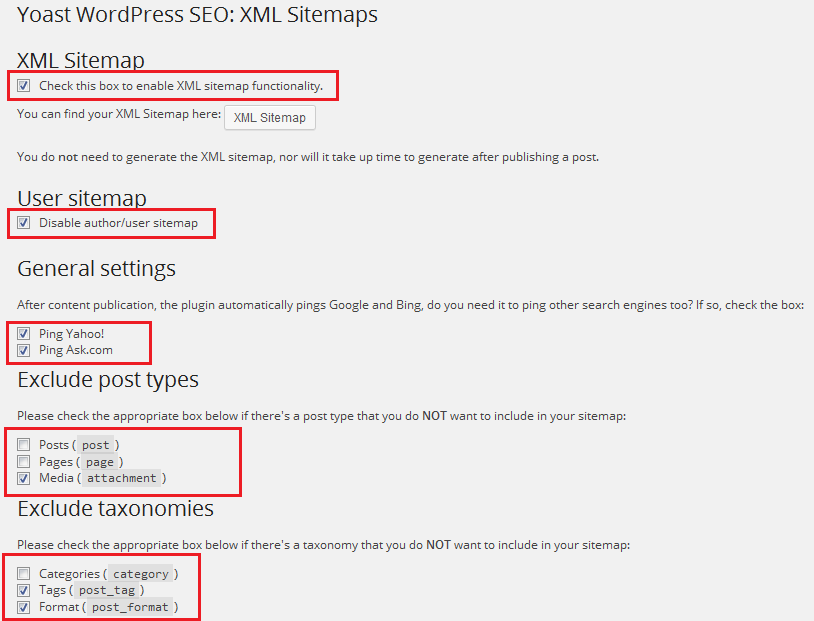
XML Sitemap: Tick the option saying check this box to enable XML sitemap functionality.
User Sitemap : Tick the option saying disable author/user sitemap. This will help in avoiding duplicate content and also keeping usernames of authors secure as attacker can directly access username through sitemap.
General Settings: tick the options saying “ping yahoo.com” and “ping google.com”.This will help in notifying search engines as soon as new content is published on your wordpress site.
Exclude post types : Tick the option saying media (attachment).
Exclude taxonomies : Tick the options saying Tags (post_tag) and Format (post_format) Just click on save changes and move to next step. - Permalinks : Leave all the settings as default as there is no need to change anything.
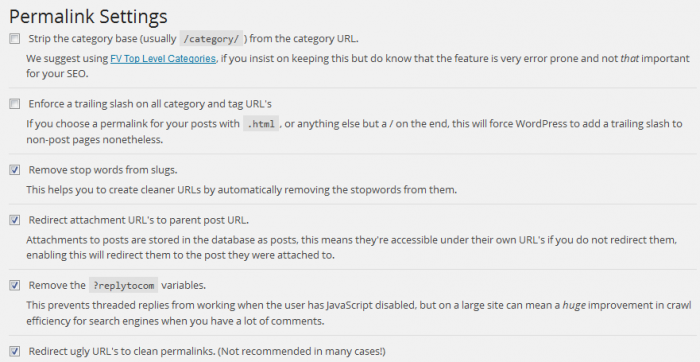
- Internal Links : Here you can configure how internal links of your wordpress site is displayed in SERPs, here you can define certain prefixes for archive and search page and also anchor text for home page. You can define special character to appear as a separator between breadcrumbs.
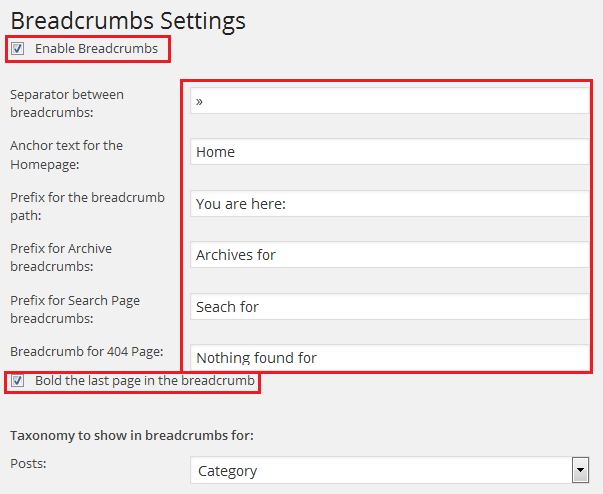 Tick the option saying enable breadcrumbs.Seperator between breadcrumbs : Enter here special character you want to use as a separator between breadcrumbs to show in SERPs.Anchor text for the home page :Enter here anchor text you want for homepage link on breadcrumbs.Prefix for the breadcrumb path : Enter here text you want to show as prefix of location to your readers.Prefix for Archive breadcrumb : Enter here prefix for archive in breadcrumb. Prefix for Search Page breadcrumbs : Enter here prefix to search page in breadcrumb. Breadcrumb for 404 Page : Enter here prefix for 404 Page. Tick the option saying bold the last page in the breadcrumb. Taxonomy to show in breadcrumbs for : Posts : Category Here you can see an example of above breadcrumb settings :
- RSS : Here by adding some tags you can prevent your content from scrapers.By adding these tags will create a link to your original post.
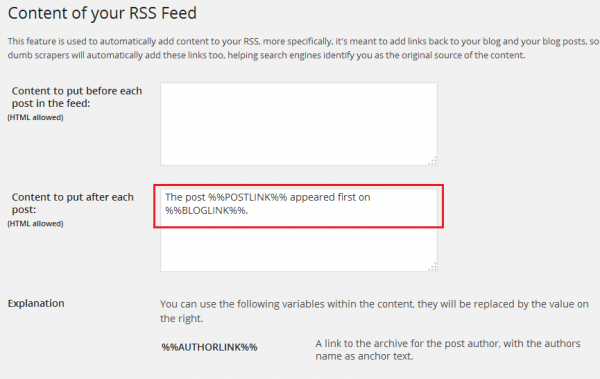 Content to put after each post : Whatever you wish, Here it is “The post %%POSTLINK%% appeared first on %%BLOGLINK%%”. Just click on save changes.
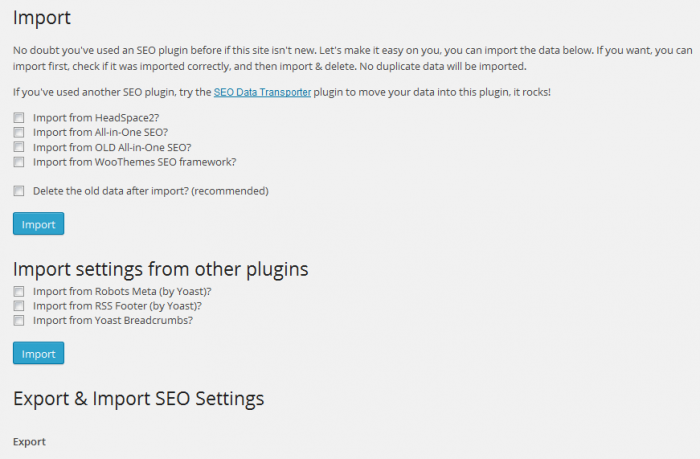
 - Import & Export : Here you can import SEO data from different plugins and also you can export SEO settings file of Yoast WordPress SEO Plugin. This will save your time if you want to set up plugin on different site from start.
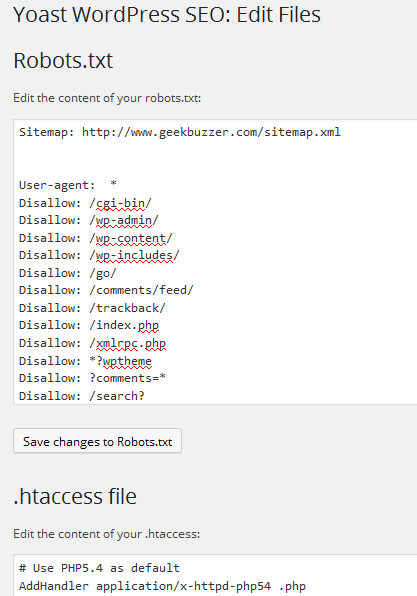
- Edit Files : Here you can directly edit Robots.txt and .htaccess file without using any file manager inwebhost.
 I hope you were able to configure Yoast SEO plugin for your WordPress Site. If you still have any issue, then drop a line in comments.
The following two tabs change content below.


Aakash Goyal
+Aakash+is a tech enthusiast who also keep on discovering latest seo and geeky tips.
Latest posts by Aakash Goyal (see all)
- Demystifying Smart Shopping Campaigns - June 15, 2019
- The Definitive Guide to Czech Republic SEO - March 12, 2017
- 13 Best Points to Add in Your Content Marketing Checklist - August 8, 2016
Yoast WordPress plugin i great SEO plugin and i am using it from last two years and it’s give me a better SEO. because it’s give all information about a page before publishing it. Your tutorial is very helpful for new Yoast user. So thanks for sharing about this great tool.
I just started using Yoast seo because I switched themes. After reading this post I better understand all of the options thank you for posting it…
I am using Yoast WordPress SEO pluginn version 2.3.5. but unable to find Yahoo.com and Ask.com ping setting options. If it is not available in this version then how can I do this. Also does plugin still automatically ping Google and Bing.
Yes, In new version of Yoast they have removed ping service to ask and Yahoo because Yahoo has moved to Bing and ask has shutdown it’s ping service.